Master the Blow Dryer: The Flawless Men's Slick Back Guide
Discover the barber's secret to a flawless slicked-back hairstyle. Learn expert blow drying techniques, essential tools, and styling tips for all-day hold.
Step out of the shower, scoop up a heavy handful of pomade, rake it aggressively through dripping wet hair, and hope for the best. For decades, this has been the standard morning routine for countless men attempting to achieve a classic swept-back hairstyle. The inevitable result? A helmet-like, greasy shell that weighs heavily on the scalp and falls completely flat by lunchtime. If you want to achieve that gravity-defying, structurally sound style—whether your aesthetic leans toward a towering, voluminous Pompadour or a sleek, tight modern Fade—the real magic happens long before the styling product even touches your hair. The ultimate secret to a flawless slick back lies entirely in the mastery of the blow dryer.
Unlike a low-maintenance Buzz Cut or a naturally forward-falling French Crop, a slicked-back hairstyle is an act of defiance against gravity and your hair's natural growth patterns. You are forcing the hair to lay in a direction it typically does not want to go. To do this successfully without relying on pounds of sticky gel, you must alter the temporary hydrogen bonds within the hair strands. Let's dive deep into the mechanics, tools, and exact techniques required to blow dry a perfect slick back that maintains its shape, volume, and natural flow from morning until midnight.
The Foundation: Haircuts and Hair Anatomy
Before you even plug in a styling tool, it is crucial to understand that a great style is built on the foundation of a great haircut. You cannot properly slick back hair that is entirely uniform in length all over the head without it looking like a spherical helmet. A successful slick back requires length at the front (the fringe or bangs) that gradually tapers shorter toward the crown. This length gradient allows the front hair to travel all the way back and rest smoothly over the hair behind it, creating a seamless flow.
Whether you are rocking an aggressive disconnected undercut or a subtle, classic taper, the principle remains the same. The sides need to be managed—either clipped short or slicked tightly backwards—to emphasize the volume and direction of the top. Furthermore, understanding your specific hair type is essential. Fine hair requires lightweight prestylers to avoid collapsing under its own weight, while thick, coarse hair demands higher heat and strong-hold products to force stubborn follicles into submission. Wavy or curly hair can absolutely be slicked back, but it requires significantly more tension during the blow drying process to straighten the hair shaft and prevent unwanted curling at the ends.
Essential Tools for the Perfect Sweep
Attempting to craft a professional-level hairstyle with a cheap travel hair dryer and a plastic comb is an uphill battle. To do this right, you need an arsenal of specific tools designed to manipulate hair efficiently without causing heat damage. Let's break down the non-negotiables for your bathroom counter.
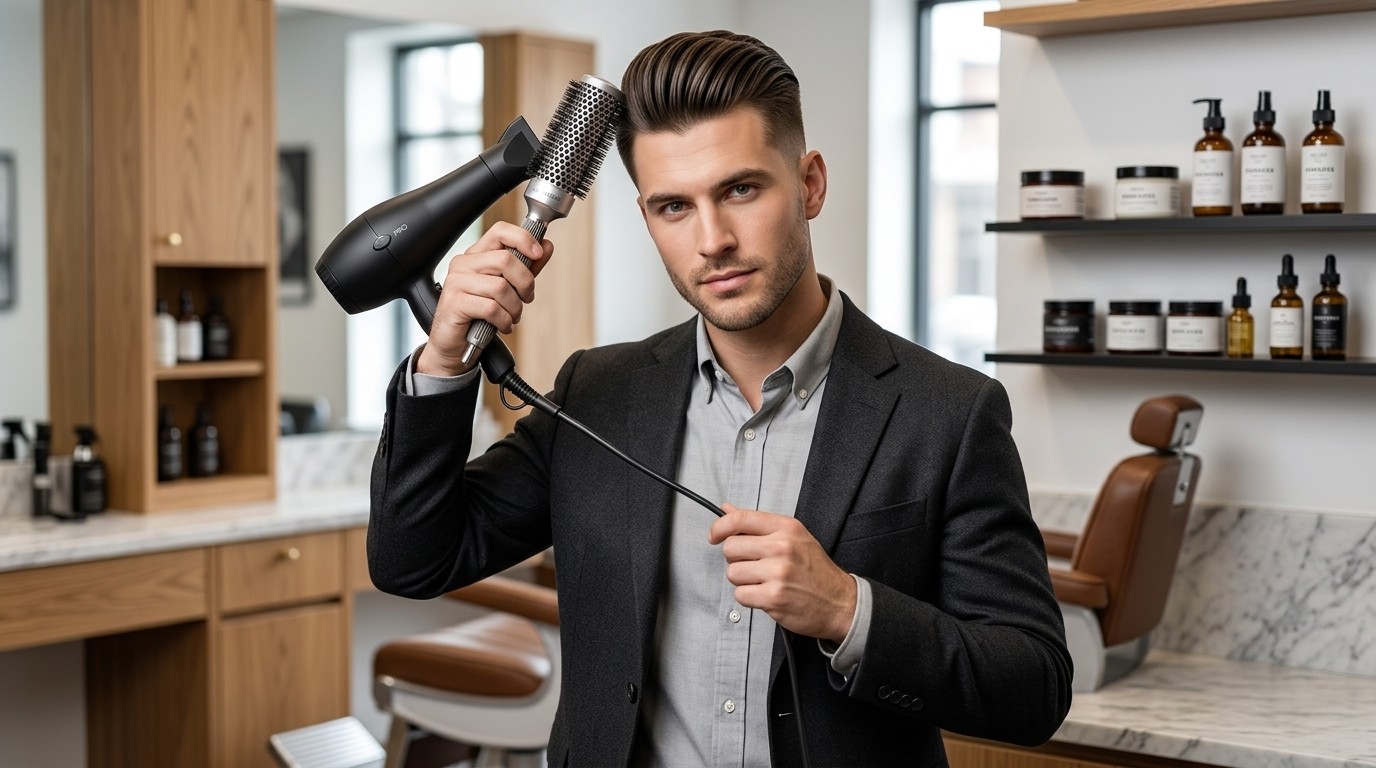
First and foremost, you need a high-quality blow dryer. Look for a device with an AC motor, multiple heat settings, multiple speed settings, and a dedicated cool shot button. Ionic or ceramic technology is a massive bonus, as these features help break down water molecules faster and smooth the cuticle layer of the hair, significantly reducing frizz. Just as important as the dryer itself is the nozzle concentrator. This flat, duck-bill shaped attachment is arguably the most critical piece of plastic you will ever own. It focuses the chaotic, wide blast of air into a precise, targeted blade of heat. Without a concentrator nozzle, you are simply blowing your hair around aimlessly; with it, you are directing the hair exactly where you want it to go.
Next, you need the right brush. For a slick back, a vented brush or a round brush is ideal. A vented brush allows airflow to pass directly through the bristles, speeding up the drying process and providing excellent root lift. A round brush, particularly one with boar bristles or a mix of nylon and boar, provides superior tension. Tension is the physical pulling force required to stretch the hair straight while the heat sets it in place. If you struggle with waves or kinks in your slick back, a round brush is your ultimate solution.
Preparation and Pre-Styling
The journey to a flawless slick back begins the moment you step out of the shower. Never start blow drying dripping wet hair. Not only does this take an eternity, but exposing soaking wet hair to intense heat can literally boil the water trapped under the cuticle, causing severe structural damage. Instead, gently pat your hair with a towel. Do not rub vigorously, as aggressive towel drying causes friction, tangles, and frizz. You want the hair to be damp—about sixty to seventy percent dry—before introducing heat.
This damp stage is the exact moment to apply a pre-styler. Pre-stylers are lightweight liquid or cream products that protect the hair from heat and provide a foundational layer of grit, volume, or control. For a voluminous slick back, a few pumps of sea salt spray or a dedicated thickening tonic worked into the roots will work wonders. If you have thick, unruly hair, a smoothing cream or leave-in conditioner can help tame flyaways. Work the pre-styler evenly through the damp hair from root to tip using your fingers or a wide-toothed comb, ensuring total coverage.
The Step-by-Step Blow Drying Technique
Now we reach the main event. Plug in your dryer, snap on the concentrator nozzle, and set the machine to medium heat and high speed. High heat should be reserved only for the most stubborn, thick hair types, as excessive heat can easily scorch fine hair and irritate the scalp.
Phase One: The Rough Dry and Root Direction
Do not reach for your brush just yet. The first phase is the rough dry, designed to remove the remaining excess moisture and begin training the roots. Using your free hand, rake your fingers through your hair, pulling it straight back from the forehead toward the crown. Follow your hand with the blow dryer. The key here is the angle of the nozzle: it should always be pointing in the direction the hair is growing and laying. Never blow air upwards against the grain of the hair, as this blasts the cuticle open, resulting in a frizzy, uncontrollable mess. Keep the airflow directed backward and slightly downward. Continue this finger-combing technique until the hair is about eighty-five percent dry.
Phase Two: Tension and Volume Building
Once the hair is mostly dry, it is time to introduce the brush to build structure. Switch your dryer to medium speed to give yourself more control. Start at the crown (the back of the top section) and work your way forward to the front hairline. Take a section of hair with your vented or round brush, dig the bristles into the roots, and slightly push forward before pulling the hair backward. This tiny forward motion creates a bend at the root, which translates to massive volume.
As you pull the brush backward through the hair, follow it closely with the blow dryer nozzle. Keep the nozzle about an inch away from the hair to prevent burning. The tension from the brush combined with the directed heat forces the hydrogen bonds in the hair to restructure into this new, backward-facing position. Pay special attention to the front fringe area, as this is where you want maximum height and a smooth, elegant swoop. Roll the brush slightly as you reach the ends of the hair to ensure they tuck neatly backward rather than sticking straight up into the air.
Phase Three: Locking it in with the Cool Shot
This is the step that separates the amateurs from the professionals. Heat is used to break down and reshape the hair bonds, but cold air is required to permanently lock those bonds into their new shape. Once your hair is completely dry and sitting exactly how you want it, turn off the heat. Engage the cool shot button on your dryer and blast the entirety of your styled hair with cold air for about thirty to forty-five seconds. Continue to brush the hair backward during this cooling phase. This rapid drop in temperature seals the cuticle, enhances natural shine, and creates a structural memory in the hair that will easily last the entire day.
Choosing and Applying the Right Finishing Product
Because you have done the heavy lifting with the blow dryer, your hair should already look like a finished slick back. It should have volume, direction, and hold. The finishing styling product is simply the icing on the cake, used to lock down flyaways, add your desired level of shine, and provide weather resistance.
Your product choice depends entirely on the aesthetic you want to achieve. For a classic, 1920s-inspired slick back with high shine, a water-based pomade is excellent. It offers a strong, reflective finish but washes out easily. If you prefer a modern, natural-looking sweep with plenty of texture, opt for a matte clay or a styling paste. These products bind the hair strands together for a thicker appearance without the greasy sheen.
The golden rule of product application is less is more. Scoop out a dime-sized amount of product and emulsify it completely in the palms of your hands. Rub your hands together vigorously until the product is warm, spread out, and almost invisible. If you skip this step, you will end up with ugly clumps of product stuck in your hair. Gently glaze your hands over the surface of your completely dry, blow-dried hair, lightly coating the top layer. Then, work your fingers deeper into the hair to distribute the product evenly. Finally, use a fine-toothed comb for a tight, formal look, or use your fingers to rake the hair into a relaxed, textured finish.
Troubleshooting Common Slick Back Issues
Even with the best techniques, hair can be unpredictable. When you are forcing hair against its natural grain, you might run into a few mechanical issues. Let's address the most common roadblocks men face when mastering this style and exactly how to fix them.
- The Crown Split: If your hair constantly parts or splits at the back of your head (the cowlick area), you are likely dealing with a strong natural whorl. To fix this, spend extra time blow drying the crown area in multiple different directions before finally brushing it straight back. Applying a slightly stronger hold product specifically at the root of the cowlick will also help glue it into place.
- Losing Volume by Midday: Flat hair is usually the result of either applying styling product to hair that was still slightly damp, or using an oil-based product that is simply too heavy for your hair type. Ensure the hair is one hundred percent dry before the cool shot phase, and switch to a lightweight styling powder or matte clay.
- Looking Too Greasy: This happens when you rely on product rather than heat to hold the style. If you use the blow dryer correctly, you only need a microscopic amount of finishing product. Cut your pomade usage in half.
- Stubborn Side Hairs: If the hair on the sides of your head refuses to lay flat, you need to use the concentrator nozzle pointing straight down while pulling the hair tightly downward and backward with a brush. Alternatively, ask your barber for a tighter Fade on the sides to eliminate the bulk entirely.
Wrapping Up Your Styling Routine
Mastering the blow dryer takes a bit of practice, muscle memory, and patience. The first few times you attempt the brush-and-dry coordination, it might feel awkward, as if you need a third hand. Stick with it. Once you understand how heat manipulates the hair and how tension builds volume, you will unlock a level of styling freedom you never knew was possible.
A flawless slick back is a statement of confidence and refinement. By investing in the right tools, properly prepping the hair, executing a methodical drying technique, and finishing with the correct cold air and product, you guarantee a hairstyle that commands respect. Stop fighting your hair with heavy gels and start guiding it with intelligent heat. Your morning routine will become faster, your hair will look significantly healthier, and your slick back will remain impeccably flawless from the moment you leave the house until you rest your head at night.